
My love of all things bright combined with my incessant urges to hop in my car and tour the country are all I have to fuel my suspicion of my "tinker" roots. However, even my more settled Irish ancestors are also known to brighten up their facades!!
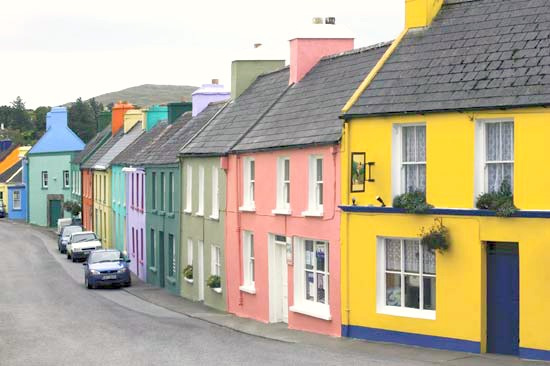
For instance in my paternal great-grandparents region on the Beara Peninsula of County Cork you will find the rainbow of facades shown in the picture above!
Then there is the love of color shown by the people of my daughters' homeland of Guatemala!

If I could have figured out how to fit those screens in my luggage they would probably be slated for use in the Can's remodel!! But not just in their decor is color confidently on display...

There are countless gardens and fountain scenes like this one in Antigua, Guatemala all over the country.

Then there are the chicken buses which serve as the backbone of the public transportation system in Guatemala!! I mean isn't it just natural that my own personal "vardo" will feature COLOR?!?!?
Besides the obvious cushion and curtain features which can display color, I decided I wanted the doors and drawer in the kitchen to sing a rainbow to my soul! What follows below is a tutorial of how I turned my cabinet doors and drawer front colorful.

The first thing I did was make a paper pattern of each door and drawer front. After deciding on the "style" I am hoping to convey, I cut the paper into a template. Being careful to pay attention to the design orientation of the fabric that I bought for the cushion backs, I laid the paper on the fabric and traced around the template.

The arrows point to the marker lines visible when the paper pattern is removed. Using sharp trimming scissors cut along the marked lines to get a finished fabric panel.

Here is one fabric panel awaiting decoupaging onto its door front and one fabric panel already affixed on its door panel.

I then used a gloss Modpodge painted on the back of the fabric panel to attach it to the painted wood panel. You can get some on the right side without concern because the next step is to generously apply the Modpodge to the correct side of the affixed fabric panel. You do want to be careful not to get the Modpodge on the surface left uncovered from fabric as it will dry with a visible "gloss".

The fabric will look cloudy when the Modgepodge is applied!!! Do not worry as it will dry clear.

When the fabric panel was dry I then went back with acrylic paint and added my border color. Now after doing 4 of the six panels of my camper I did happen on another "time saver". If I was blessed with more patience and less instant gratification drive I probably would be done with all of these by now! The last two panels I decided to paint the orange FIRST and then Modpodge the fabric saving me from all those curves needing to be carefully painted.

The orange border then needed to be framed!! I used some left over acrylic paint from another project and painted a thin line to accentuate the fabric.

One mention here that I am NOT sponsored by any of the products I may show you that I use!! I just put it up here to hopefully save you the bazillion hours of Google searching like I have been doing during this remodel! I finished up the process by sealing it all with a clear acrylic spray on sealer that I bought at Walmart. Time will tell if it holds up or yellows!!

Remember I told you that the old fabric from the Can became my drop cloths?? Quite visually overwhelming to see print on print, sorry! This is the last view I can give you because I want to save the whole effect for the "big reveal" post. Despite my plans to reuse the hinges I did give in and get new ones in white to match the cool new pulls I got. Again, sorry to tease but the pulls will be seen in the reveal!

In the meantime....I have a repair to finish! In my zeal to move on to the next door panel I got careless and dropped the one I had just painted. Besides needing to redo the orange painted border I will need to "rebuild" the corner that crunched upon impact.

Dang that particle board!!!
Very creative! I love your ideas.
ReplyDelete