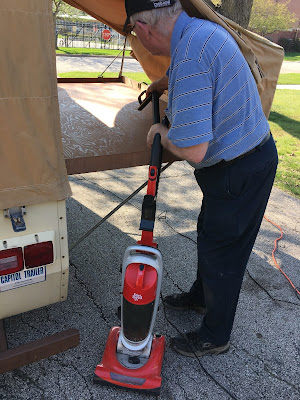
The process started with Mr. Creature Comforts giving the bunk a quick "hoovering"....we speak a rather unique combination of American English, Irish English, Irish, and Spanish in this house. While the girls and I vacuum he "hoovers". Oh wait, I mean I vacuum and he "hoovers" because the girls are not inclined to the domestic arts usually.
Except if you happen to be excited about the new to us camper. Shutterfly found a good sweep was not beneath her this once anyhow.
Next up was a thorough scrubbing but the matter of a tent canvas needed to be addressed first!
In fairness to Mr. CC this photograph is pre-hoovering!! Back in the day it appears that the staple gun was a favorite tool as most all of the Can is held together with staples!! The long side of the bunk had the wall of the canvas tent stapled to it. As I made the executive decision to pull the staples and free the bunk of all its canvas, Mr. CC came up with a brilliant solution to my dilemma of how to repair the failing seams. Since it is attached up at the ceiling pretty firmly and I am loathe to open that Pandora's Box just yet I was resigned to doing the multitude of canvas repairs by hand. His idea....bring my machine out to the camper table and do all the repairs that can reach thus reducing the amount of hand sewing in my future. He is a keeper that Irishman of mine!!!
The bunks are lifted and pulled over the side walls of the Can with these cotton webbing straps in sad, sad condition.
Yes, everything was held by staples!! The straps have been sprung free of their servitude. Now there was full access to get to the scrubbing portion of our story. TSP and water combined with protective gloves and scrubbing sponges were employed next.
Teamwork. This old couple finally have mastered teamwork. Took twenty years but better late than never!!
Gag!! I mean I was prepared for filth given the previous owner was a single dad and his teenage son but to see it in real life, yuck.
This may be the last picture of me working on the Can if they insist on catching me sweaty and burned despite remembering to wear my hat. Irish Americans are just like the Irish. We don't do sun well!! We love to soak it in but it doesn't play fair and burns any exposed surface in a nanosecond! All that to say that my bed got a paint job.
Not as good a paint job as my sister would have given it but seeing as how it will be under a mattress and a tent canvas....good enough! The plywood was begging for paint it was so dry!! I figured two coats of paint might extend the life of the bunk long enough to last the duration of our relationship.
I did this while Mr. CC was catching some of the golf tournament on TV. It dried over dinner and then onward and upward!!
Home Depot to the rescue once again. The bottom of the bunk's short ends slide in and out over the metal side walls and showed a lot of wear and tear on the plywood. I decided to try and see if I could help preserve them by adding this plastic corner guard.
Time will tell if this helps. I am kind of thinking a harder plastic or silicone product would do better but in the meantime this will do!! Should there be any news on this in the future I will be sure to update here on the blog.
I have been trying to come up to speed on glamping remodels over on Pinterest and quite a few pins reference the increase comfort that can be obtained by using these fatigue preventing foam floor tiles. Lucky me that my new best commercial retailer Home Depot has expanded from the standard black that others used on their remodels.
I get faux travertine in Zan's Can!! They are easy peasy to cut and lock together like puzzle pieces. I got ever so lucky that the bunk is two squares wide meaning the only cuts I had to do were to fill that last 5 inches or so at the one end. [note the pre-stageing of the next step LOL]
A marker, measuring tape, straight edge and cutting implement are all you need for this bunk upgrade.
Simply cut on the line, fit the tabs into the slots and a light weight upgrade option to improve the bunk comfort is done!
Really not sure why this makes me so happy since a mattress will be covering it anyhow?? I am positive it is that sense of accomplishment that one more project on the Can is complete!! Oh, those straps...
JoAnn Fabrics this time folks!! Wider black nylon strapping replaced the green cotton and right down in my sewing room I found upholstery tacks to secure it to the side. Now just to get the foam and coverings in order! But that will wait until after Sweet Pea's bed gets completed which I am kind of hoping will happen by tomorrow....because then I have to go back to the day job. I'm still keeping my skills up for the day job though:
Extractions are extractions folks!!!


No comments:
Post a Comment